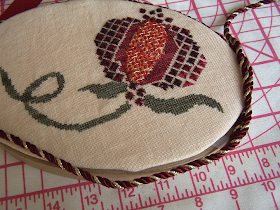
I finished stitching the Pomegranate - FINALLY! I think it turned out really great! I made some adjustments to the pattern which I will add to the instructions, so you can download them again for the latest version!
I've decided to mount this design on a box top - I think it will look great! But sometimes you spend quite a bit of time choosing just the right box. You can mount your needlework on almost any kind of box - I thought about this little gift box - it's just the right size, and held a gift from someone special, so I saved the box (I'm sure you know how that goes)!
No - I don't think it's substantial enough, and I like the detail on the top of that box...hmmm - I LOVE this box - especially that wrap-around detail!
But it's not big enough to get the whole piece on the top.
This papier-maché shaker box is just right!
Now I can prepare the stitching. I'll mount it to a piece of cardboard first. Trace around the box top to get the right shape and size.
Cut about 1/8 inch inside the tracing, because your pencil is going to fit on the outside of the lid, and you want your needlework just inside the borders of the top.
Fit the cut out to the box top - trim until just a bit of the box top shows all around.....
Now that you have this the right size, cut out some batting to fit on top. Do this the same way. If I thought this was going to be an heirloom piece, first of all, I wouldn't have used cardboard - I'd have found some acid-free rag paper card - the kind used for picture mats in good framing shops. And I would use Warm and Natural or some other all-cotton batting. Since it's not going to be an heirloom, I will cut a corner here and use a batting that has glue on one side and can be ironed onto the cardboard to hold it in place.


I just use one layer of a thin batting, as I don't want a high loft, but just a bit of padding to soften the look a tad. If you like it to look a little more "padded", add more layers of batting.


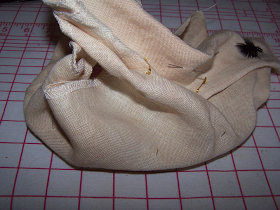
Now you can fit the linen around the cardboard - adjust so the stitching is placed as you like it on the front, and pin in place. (Do not have trimmed your linen yet).
Now you can turn it over and trim the back to about two inches from the edge all around. Be careful - those pins are sharp! If we'd been using foam core or something like that, you could pin into the edge, but since it's just corrugated cardboard, that won't work, and you'll have to pin into the front, through to the back.
If you SHOULD have an accident with those pins, or when you're stitching with a sharp needle, your own saliva will remove the blood best - it's pH balance is the same as the blood. I'm just saying...
Turn the piece over and trim.
Take a running stitch around the edge of the linen to pull the linen close to the surface.
Take out the pins and tighten the linen around the cardboard.
Now check the front and make any adjustments as to placement.
Lace the linen tightly. One of the cool tricks someone taught me about lacing is - after you've drawn your thread from one side to the other, take a little stitch or two while your thread is pulled very taut. (hold it in place with your finger) This anchors the thread at that tension and ensures that the thread won't stretch and buckle after awhile.


Judy Odell talks about "thread lacing and glue lacing", meaning she holds the piece in place with hot glue (she's a hot glue wizard - my fingers get burned too easily), and I have my own little trick - "tape lacing"! If you don't want to lace with thread, you can use first aid tape which is acid free and easily found at any drug store.
Now you're ready to mount your stitching on the box top.
Place it how you want it and glue in place. For a paper box like this, almost any glue will do - though I usually will use something very strong - like E6000. Weight it down with a heavy book and let it dry - at least overnight.
When the glue is dry you're ready to apply a trim! Again, choosing which trim to use can be fun, though time-consuming. Here I look in my box of trims and try a few different choices.


Oooh - I've been looking for those! Hmmmm - I COULD glue pearls all around - but no - that doesn't really work with the red beads...


None of these is quite right.
Oh, this would be perfect if only it were red!
This is it!
Now - to attach it, we need to think about how we're going to finish it. The ends of this stuff fray pretty badly (or have to be held together with tape - not quite the look we're going for).
I think I can maybe fray the ends and make them a bit like tassels. So, to finish, I'll tie a bow. So I can put the finish in the front, since the bow will cover a multitude of sins.
Hmmmm - that doesn't really look right... Okay - we'll finish it at the back and tuck the ends in.
To hold the trim in place while I sew it on, I use my trusty old double-sided tape!
Because this is really not an heirloom piece, I don't worry about putting the tape right on the linen. If you wanted to keep the sticky stuff away from your stitching, you could pin or hold the trim in place while you sew it on.


When you peel away the red layer, you can see that a very thin layer of glue stays in place, ready for you to place your trim. Just snug it into place all around. It will hold while you sew the trim to the ribbon.
Choose a thread that matches (I usually use DMC thread for this because you have so many colors to choose from).


Tie a knot in the thread and begin to sew around the edge, placing your threads carefully with the twist of the cord. There is a thread in place just under my finger.


Sometimes, using a curved needle will help with this. I like to use a very fine beading needle, but they come in many different sizes, including both sharps and tapestry points.


Sew the trim in place all around until you come to your starting place. Tuck both ends under the linen, and butt them up against each other, folding the last section back so as not to show the taped end of the trim.


Depending on how this looks to you, you can leave it now and call yourself finished. I didn't get the finish to look quite as polished as I'd like, so I've decided that a bow would be good after all, and I can get it to look more like I want by tying it separately and adding it later.


I think this will look great once the bow relaxes a bit and I can comb out the tassel a little more.
If you didn't want a bow, but needed to put something over your finished ends (this happens to me all the time), you can choose any number of finishing touches - a pretty brooch or set of beads, almost any little embellishment will work. After you get to be a bit more practiced, your ends will finish up nicely, and you probably won't need to cover anything!
Good luck with your finishing! This box is almost ready for display now - but I think I will need to paint the outside and maybe line the inside with a pretty paper. Obviously, you would normally paint the box first, but who had time for that? Watch this space for more tutorials!


!Que bonito!!! me encanta este bordado. Un saludo
ReplyDeleteThanks! This is timely -- I have a piece I want to mount on a box. It won't fit all the way to the edge, but that's ok. :D I'm looking forward to the edge treatment. That's the part that always gets me -- how to hide the ends of the trim!
ReplyDeleteThanks so much for the wonderful tutorial. I've been wanting to do this for a while and was unsure as to how to go about it!!
ReplyDeleteyour instructions are great - very precise and the photos really demonstrate what you are doing. though I'm not doing needlework,I have some vintage linens that I would like to highlight the embroidery - I'll have to be on the lookout for some boxes!
ReplyDeleteI love the internets. I just googled "How to attach needlework to a box" and the first hit was to your blog. Your excellent instructions and photos were just what I needed. Mine is a needlepoint, stitched all the way to the edges of my pattern, but I can adapt. Thanks for posting this. Your work is beautiful.
ReplyDelete